Sunday, August 30, 2009

Pet Portraits

My Art Club Classes will be starting again soon! But until then, I thought I'd share one of last year's projects: Pet Portraits.
I teach after school art at three elementary schools, with about 125 students in 7 classes. For this project, the artists first identified the shapes they saw in the animal photo, and then they sketched with pencil. We used oil pastels, blending with a turpentine substitute, to shade and color.
Some of the kids brought in photos of their own pets, but most used photos I've collected over the years from calendars and animal advocate publications like Best Friends and The Humane Society.


(Okay, some of these wouldn't really make very good pets.....)


Others are animals kids would LOVE to have, but a drawing will have to do for now...


I love how they each develop their own style- this artist always chooses lots of color!


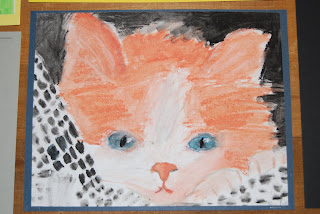
Love the polka dot background on this one...


This one of a parrot includes the hair on the arm of the person holding it...


When they finished these, they could do an abstract based on an animal.


Aren't they wonderful artists? Grades 1 through 6


Wednesday, August 26, 2009

Make it Peachy!


My Nana made the BEST peach cobbler-sweet juicy goodness and a thin crispy crust. When I was first married, I asked her for her recipe. Let's just say, her "recipe" wasn't designed for a cooking newbie. When I asked her how many peaches, her answer was, "It depends on how big your pan is." "How much sugar?" I asked, and she answered, "It depends on how sweet your peaches are."
But over the years, I've found that her "recipe" was exactly right!


Mine is a deep dish, spiced peach pie with a single top crust, baked in a small roasting pan. It's very juicy, so serve it in a bowl. I make enough crust for a two-crust pie so I can make pie crust "cookies" to serve along with the cobbler. (Though they often don't last long enough for the cobbler to cool!)
My Peach Cobbler...
Like Nana Used to Make
(Fits my 10"round, 3"deep pan)
Filling:
10-12 C. ripe peaches, peeled, pitted, & cut into thick chunks
3/4 C. sugar
1 tsp. cinnamon
1/4 tsp fresh ground nutmeg
1/2 C flour
Mix flour, sugar and spices. Add to sliced fruit. Mound prepared fruit in baking pan.
Crust:
2 C. flour
1/2 tsp. salt
3 tsp cinnamon sugar, divided
1/3 C. butter (or shortening)
1/3 C. shortening
7 T. ice water
Mix flour, salt, and one teaspoon cinnamon sugar. Cut in shortening to a fine "cornmeal" like texture. Cut in butter to the size of small peas. Sprinkle with ice water, one tablespoon at a time, lightly tossing with fork after each addition. Gently gather into ball; divide in half.
Roll out one half large enough to cover pan with 1 1/2 inch overhang. Top fruit with crust and press to edge of pan, shaping as desired. Prick top with fork. Spray top crust lightly with cooking spray (or brush lightly with melted butter) Sprinkle generously with cinnamon sugar.
Cover edge with foil or pastry ring. Bake in a 375 degree oven for 25 minutes. Remove foil, bake another 25 minutes or until golden and bubbly. Cool to warm or room temp. Serve in a bowl with a scoop of homemade vanilla ice cream and pie crust cookie.
Pie Crust Cookies
Roll out crust to scant 1/4 inch thickness. Spray with cooking oil spray or brush with melted butter. Sprinkle with cinnamon sugar. Cut with mini cookie cutters, or use knife to cut into small squares or diamonds. Move to cookie sheet and bake at 375 until golden. Cool.


Monday, August 24, 2009

80/60 Party


I thought I'd share some of the little things that made our 6oth Anniversary/80th Birthday Party for Dave's parents such a sweet success.

Planning...Because this was held out of state, almost everything was researched, coordinated, and ordered online. Once we arrived, we were able to take care of the details in the short time we had- one day before the party, and a few hours the morning of.

(A photo of our different "To Do List" styles!)

Costco...We didn't use a hotel/caterer, but still had a nice party at a third of the cost. We used a church hall, and Costco was the base for our menu.: Salmon with Raspberry Chipotle Sauce (easy to make the night before), Ceasar Salad, (made the morning of) and pre-made Chicken Salad (we added grapes and cashews), Potato Salad, Pasta Salad, fruit &veggies, cheese &crackers, chips w/salsa, strawberry lemonade, sodas, and cake. I also order mini cupcakes from a great little cupcake place. (More on that later...)


Our "Indoor Picnic" Theme helped our casual menu and setting work. Red/White checked table toppers, fresh daisys & sunflowers in canning jars tied with lime green ribbon, centered on round red placemats, red plates, lime napkins. I scattered a few little plastic ants on the tables for a touch of picnic "realism", and used several picnic baskets on the food tables and photo table. Looked simple but nice....


... But adding the "Balloon Trees" really helped create the picnic setting and added so much to the festive feel! (Several shades of green balloons, tied with brown ribbon trunks)


Favors...Every party needs favors... So I pulled out my FAVORITE punch, the Daisy punch..


...Layered two white daisys, added the yellow centers (using a regular sized paper punch)...


Fluffed the top flower...


And then filled small bags with jelly beans and candy watermelon slices.


I use the daisy punch all the time! One's from a craft store, but I couldn't pass up the second found at a thrift store. I even found the green circles, already cut, and the string I used to tie them to the bags, at Value Village! Thrifting for art supplies is now a regular part of my treasure hunts...

Flexibility...Not everything worked out exactly as planned.. I ordered mini cupcakes from Icing on the Cupcake, http://www.icingonthecupcake.com/ and Kim (DIL) made CUTE fondant daisys to put on them. But when we went to pick them up, they'd made full size cupcakes instead! Once we tasted them, we didn't mind- they were fabulous! But we had cake and cupcakes coming out our ears!

Family...Planning with everyone, and then working on things together is really what made this party wonderful! A giant THANK YOU to everyone who pulled together to celebrate these happy occasions.

Make it... Wonderful!

Friday, August 21, 2009

Blues and Salmon Salad


This isn't really a foodie blog, but I'll share a recipe every now and then! This is tonight's dinner:
Blues and Salmon Salad adapted from a recipe by Greg Atkinson.
Make the dressing:
1/4 C rice wine vinegar
1 T. spicy brown mustard
1 T. sugar
1 tsp. kosher salt
3/4 C. canola oil
1/2 tsp. coarse black pepper
1 T. poppy seeds
Whisk all but last three ingredients. Dribble and whisk in oil. Add pepper and poppy seeds.

Make the salad:
About 4 C. washed and dried baby spinach leaves
1/2 C. white sweet onion, sliced thin
3 C. fresh blueberries
1 C. baby portobello mushrooms, coarsely chopped or sliced
1 1/2 C. smoked wild Alaskan salmon, broken into large flakes
Combine salad ingredients. Toss with the dressing to taste reserving extra for another use. Makes four servings.
Serve the salad with a slice of good bread on your latest thrift store plates! (I love these ruffled ones found last week at Value Village.)

Thursday, August 20, 2009

Building a Bundle of Love

I built my Iraq Bundle of Love today!

I picked up some of the APO Flat Rate boxes from the Post Office- one for me and some more for my quilt group. I had to ask for the right ones- the boxes on display were not APO boxes. That's important- APO boxes ship at a reduced rate- $11.95, whatever fits in the box.
So that was step one. Next, I taped one end of the box...

And in the process, I dropped my camera, and a piece of the lens casing broke off!! The lens isn't securely attached to the body now... So a trip to the camera store is now on the list for tomorrow...

After I recovered from the camera mishap, I found some ribbon to tie the bundle. I'm recycling some wedding ribbon I've had since one of our sons got married EIGHT years ago. (Yes, I save nearly everything, but stuff eventually gets used up!) I made a "plus sign" in the box with the ribbon, then took one of the large fabric pieces and opened it over the ribbon.

I filled the box to the brim with fabric- fat quarters to two-yard pieces. I put in a few 10-inch pinwheel blocks for fun, and ended with one last big piece...


The whole thing was then ready to bundle, all securely tucked and tied.


Almost done! I sealed the box and filled out the customs declaration form (5 minutes). Tomorrow when I take my camera in, I'll stop at the Post Office to mail my Bundle of Love. I know someone will make good use of this small gift, and maybe there will be just a little more peace in the world!
Have you put yours together yet? Remember, they must be postmarked by Sept.7th.
Go to this link to get the address, and to watch the progress. http://ibol.wordpress.com/
Make it...Wonderful!

Monday, August 17, 2009

A Give-Away!

Well, this is not the usual blog giveaway... Because you'll be doing the giving right along with me! This is your chance to clean out your stash and help people at the same time.
I read about Iraq Bundles of Love, and I know you'll want to be part of this! A US soldier is collecting bundles of fabric and other sewing supplies to leave with the people of Iraq. If you have any fabric, buttons, thread, or other useful materials, you can be sure they will be put to use, and will help to build peace and goodwill as well.
Here's the link to learn more: http://ibol.wordpress.com/

The deadline is September 7th, so no time to waste! Our quilt group is participating-let me know if you can too!

"...love is something if you give it away, give it away, you'll end up having more..."

Friday, August 14, 2009

The Ties That Bind...

My father-in-law is a tie man. He taught high school English for 27 years, and his wild ties were an important part of his teacher identity. I'm sure his students were entertained by this diverse collection. (I don't think he wore ALL these to school- at least I hope not!)


These are my favorite ones- 8 fantastic polyester marbled ties from 1969.The one that looks like tree rings is his favorite- mine too. They really are beautiful, but...

...who has EIGHT marbled ties??


Bill recently celebrated his 80th birthday, and this quilt is a gift from his children:


The "Ties that Bind"quilt represents just a portion of his tie collection. It was put together by my husband's sister Joyce and her friend Cindy. It measures 59x80 inches, and is made up of over 50 ties. About four or five of the ties were handmade by Joyce. Some of the tie labels are sewn on the front of the quilt, and we had fun talking about the stores, long out of business, represented by those labels and the beautiful (and not so beautiful!) ties. This photo actually tones down a few of the hot pink ones...

Bill still has over 50 ties, including the marbled ones, a knit tie he wore when he was 24, and the tie he wore to his wedding 60 years ago. Bill now has the quilt displayed on a couch near their bed, so it's the first thing he sees when he wakes up in the morning. Happy Birthday Bill!
Make It...Wonderful!


Tuesday, August 11, 2009

Simple Circle Quilt, Part Two


Welcome back for Part Two of the Simple Circle Quilt Tutorial! Once I have the circles zig- zagged, I pull the threads to the back and tie. (Or backstitch...pulling the threads to the back is just a bit neater looking.)

I chain piece the blocks... Again, the numbers really help since I pick up the pairs in vertical rows.


I like to then sew them together into four-patch blocks, but I know some of you prefer to do rows instead. Whatever you like..


Because my design is an uneven number of rows, the last row is added after all the rest of the blocks are sewn together...


Next, I add my skinny border. For the Pink/Orange Quilt, I used scraps of my greens and pieced a strip 1 1/4 inches wide. For the Blue/Brown one, I decided it needed the POP of some orange, so I decided to use one fabric instead. Measure your circles unit to determine how long to make your border strips. Sew to opposite ends. Then sew the skinny border to the remaining two sides.


Remember those 3-inch wide strips of your print fabrics you set aside at the beginning? Now's the time to grab those and stitch them together into two 6-strip units.


Cut those into 6-inch wide blocks. Sew them together end to end, alternating the order between the two units to create a semi-random arrangement.


Sew the piano key border to two opposite ends of the circles unit, then the remaining two sides.(The measurement will not align perfectly- so the end of your piano keys may have a block that is not as wide as the others. I don't mind this. Hope you don't either.... I think it adds to the scrappy-quilt quality....) You can also use some of your leftovers from cutting out the circles if you want to mix it up more or emphasize a particular fabric.


Speaking of scrappy, my piano keys on the Pink/Orange quilt were not 6 inches- they measure 3 1/2 finished. I was using the leftover blocks from the Q-Along, so I actually STARTED with the dimensions of the piano keys, and built the quilt backwards to fit! So there are lots of ways to think about your quilt plan, based on what you have and what you need!


Here's the Blue/Brown top to add to my always growing stack of tops in need of quilting!


Let me know if I need to clarify anything- this is my first Tute! And when you make your own circle quilt, I'd love to post your photos here!
Make it...Wonderful!